

🍳 In This Article
There’s a magical moment when you bite into a perfectly cooked falafel – that satisfying crunch of the exterior giving way to a tender, herbaceous interior. For years, I adored falafel but shied away from making it at home, intimidated by the deep-frying process and the inevitable oil splatters. Then, a few years ago, I decided to experiment with baking, and let me tell you, it was a game-changer! Not only is baked falafel healthier, but it’s also incredibly easy to achieve that coveted crispiness without all the fuss. Paired with a vibrant, cooling homemade tzatziki, this dish isn’t just a meal; it’s an experience that transports you straight to the sun-drenched shores of the Mediterranean.
What Makes This Dish So Special
Falafel, with its ancient origins rooted deeply in the Middle East, is far more than just a simple chickpea patty; it’s a culinary icon. Tracing its history back to ancient Egypt, where Coptic Christians are believed to have created it as a hearty meatless meal during Lent, falafel has evolved and spread across the globe, becoming a beloved street food and a staple in many cultures. What makes it so enduring is its incredible versatility and the comforting blend of earthy flavors that resonate with almost everyone, whether enjoyed in a bustling market or a quiet home kitchen.
The true magic of falafel lies in its aromatic symphony of flavors. Imagine the warm, slightly nutty notes of cumin and coriander dancing with the bright, peppery freshness of parsley and cilantro, all underpinned by the pungent kick of garlic and onion. When baked, these flavors intensify, creating a patty that is both robust and wonderfully light. This rich, savory profile finds its perfect counterpoint in the creamy, refreshing embrace of tzatziki sauce, a Greek-inspired dip that brightens the entire experience with its cool cucumber, zesty lemon, fragrant dill, and a hint of garlic.
People flock to falafel for countless reasons, but for many, it’s the textural contrast that truly captivates. Our baked version delivers an exceptional exterior crispness that beautifully complements the soft, moist, and flavorful interior. It’s also an incredibly satisfying and wholesome vegetarian option, packed with plant-based protein and fiber from the chickpeas. For those seeking a healthier take on a classic, baking eliminates the need for excessive oil, making this a guilt-free pleasure that doesn’t compromise on taste or that delightful crunch.

📷 Photo by Nataliya Vaitkevich on Pexels
According to Food Network, mastering fundamental cooking techniques makes every recipe easier and more delicious.
Ingredients You Will Need
Crafting the perfect baked falafel and a vibrant tzatziki requires a few key ingredients, each playing a crucial role in the final flavor and texture. Here’s what you’ll need, along with why each component is so important:
For the Crispy Baked Falafel:
• 1 ½ cups (about 250g) dried chickpeas: This is non-negotiable for authentic falafel texture. Unlike canned chickpeas, dried ones, once soaked, maintain their integrity and produce a much better, less mushy consistency when processed. They’re the foundation of our falafel, providing protein and structure.
According to The Kitchn, mastering fundamental cooking techniques makes every recipe easier and more delicious.
• ½ cup fresh parsley, roughly chopped: Adds a vibrant, fresh, and slightly peppery green note that is characteristic of traditional falafel.
• ½ cup fresh cilantro, roughly chopped: Contributes another layer of herbaceousness, with a bright, citrusy undertone. If you’re not a fan of cilantro, you can use more parsley or a mix of parsley and mint.
• ½ medium yellow onion, roughly chopped: Provides a foundational savory depth and a touch of sweetness.
• 4-5 cloves garlic, minced: Essential for that pungent, aromatic kick that defines falafel.
• 1 teaspoon ground cumin: A warm, earthy spice that is central to falafel’s flavor profile.
• 1 teaspoon ground coriander: Adds a complementary citrusy-floral note that brightens the cumin.
• ½ teaspoon cayenne pepper (optional): For a gentle warmth and subtle kick; adjust to your spice preference.
• ½ teaspoon baking powder: My secret weapon for baked falafel! It creates tiny air pockets, ensuring the falafel stays light and fluffy on the inside, preventing it from becoming too dense.
• 2 tablespoons all-purpose flour (or chickpea flour for gluten-free): Acts as a binder, helping the falafel patties hold their shape during baking.
• 1 teaspoon salt, plus more to taste: Enhances all the other flavors.
• ½ teaspoon black pepper: For a touch of mild spice.
• 2-3 tablespoons olive oil: For brushing the falafel before baking, promoting that beautiful golden crust and helping with crispiness.
For the Creamy Tzatziki Sauce:
• 1 cup full-fat Greek yogurt: The base of our tzatziki. Full-fat provides the best creamy texture and rich flavor. Avoid non-fat as it can be too thin.
• ½ English cucumber, grated: Adds a refreshing, cooling element. English cucumbers are preferred for their fewer seeds and thinner skin.
• 2 cloves garlic, minced: Infuses the sauce with a necessary aromatic sharpness.
• 1 tablespoon fresh dill, finely chopped: The quintessential herb for tzatziki, offering a distinct fresh, slightly anise-like flavor.
• 1 tablespoon fresh mint, finely chopped (optional): Adds another layer of bright, cooling freshness, enhancing the Mediterranean feel.
• 1 tablespoon fresh lemon juice: Brightens the sauce and balances the richness of the yogurt.
• 1 tablespoon extra virgin olive oil: Adds a silky texture and a touch of fruity richness.
• ¼ teaspoon salt, plus more to taste: Balances the flavors.
• Pinch of black pepper: For a subtle enhancement.

📷 Photo by Ragil Tagiyev on Pexels For more delicious ideas, check out our snacks and appetizers section.
Step-by-Step Instructions
Crafting these golden falafel patties and their cooling tzatziki counterpart is a straightforward and rewarding process. Follow these steps for a perfect meal that’s bursting with flavor and texture.
- Step 1: Prepare the Chickpeas (The Night Before): Place the dried chickpeas in a large bowl and cover them with at least 4 inches of cold water. The chickpeas will expand significantly, so ensure ample water. Let them soak at room temperature for a minimum of 12-18 hours, or up to 24 hours. After soaking, drain the chickpeas thoroughly in a colander. This step is crucial; do not cook the chickpeas.
- Step 2: Make the Falafel Mixture: In a food processor, combine the soaked and drained chickpeas, fresh parsley, fresh cilantro, chopped yellow onion, minced garlic, ground cumin, ground coriander, and cayenne pepper (if using). Pulse the mixture in short bursts, scraping down the sides as needed, until it is finely chopped but still has some texture – you don’t want a completely smooth paste. The mixture should hold together when pressed. Add the baking powder, flour, salt, and black pepper. Pulse a few more times to incorporate.
- Step 3: Chill and Shape the Falafel: Transfer the falafel mixture to a bowl, cover it, and refrigerate for at least 30 minutes. This chilling period helps the mixture firm up, making it easier to shape and preventing the patties from crumbling during baking. Once chilled, preheat your oven to 400°F (200°C). Line a large baking sheet with parchment paper or a silicone baking mat and lightly brush it with about 1 tablespoon of olive oil. Using your hands or a small scoop, form the falafel mixture into small patties or balls, about 1 ½ to 2 inches in diameter and ½ inch thick. You should get about 18-20 falafel.
- Step 4: Bake the Falafel: Arrange the shaped falafel patties on the prepared baking sheet, ensuring they are not overcrowded. Lightly brush the tops of the falafel with the remaining 1-2 tablespoons of olive oil. Bake for 20-25 minutes, flipping them gently halfway through the cooking time (around the 10-12 minute mark), until they are beautifully golden brown and crispy on both sides. The internal temperature should reach about 165°F (74°C).
- Step 5: Prepare the Tzatziki Sauce: While the falafel bakes, prepare the tzatziki. Grate the English cucumber using the large holes of a box grater. Place the grated cucumber in a clean kitchen towel or several layers of paper towels and squeeze out as much excess liquid as possible – this step prevents watery tzatziki. In a medium bowl, combine the full-fat Greek yogurt, squeezed grated cucumber, minced garlic, finely chopped fresh dill, finely chopped fresh mint (if using), fresh lemon juice, extra virgin olive oil, salt, and black pepper. Stir well to combine all ingredients.
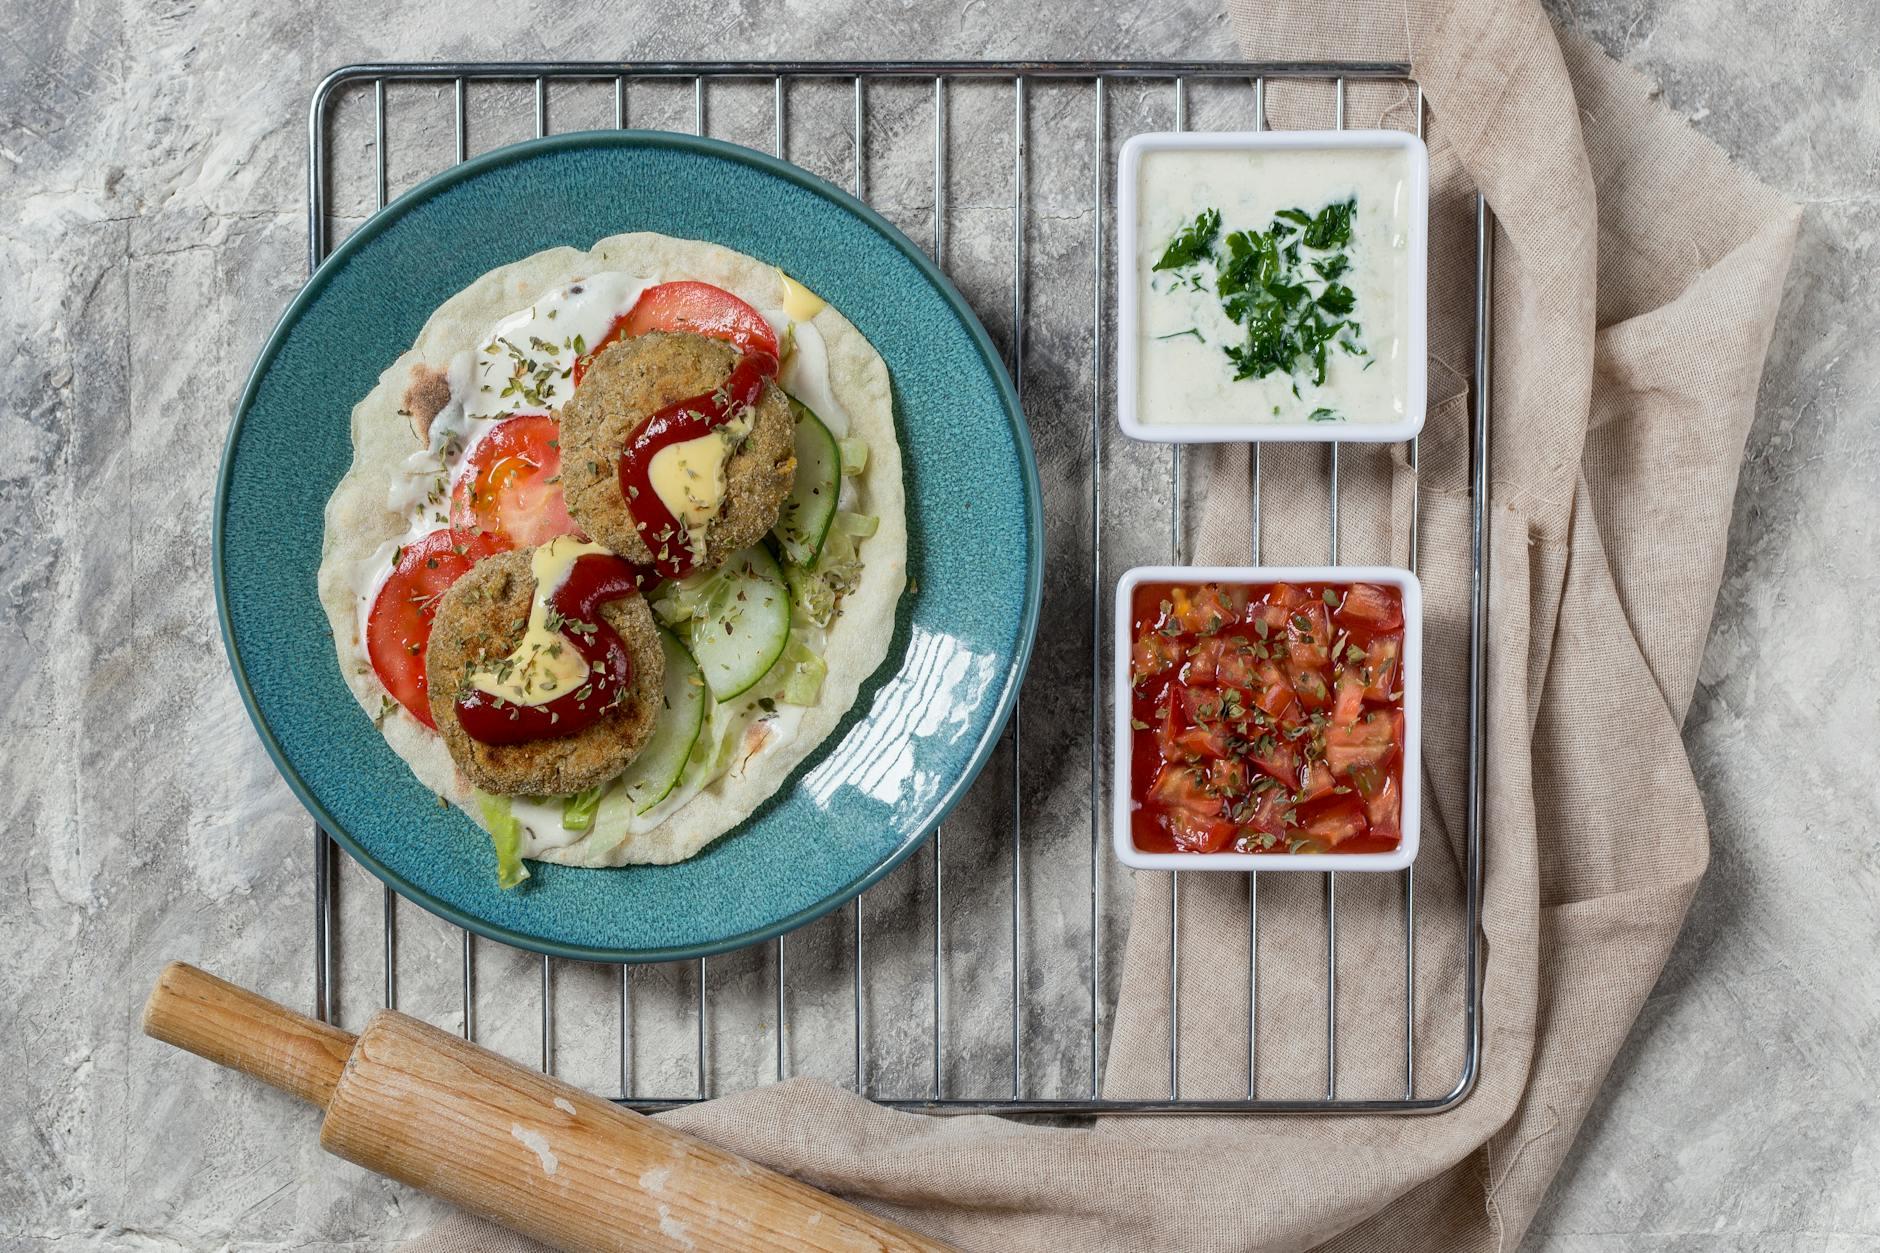
- Step 6: Serve and Enjoy: Taste the tzatziki and adjust seasonings if necessary. Once the falafel is baked to golden perfection, remove it from the oven. Serve the crispy baked falafel immediately with the cool, creamy homemade tzatziki sauce. They are wonderful served in warm pita bread with shredded lettuce, diced tomatoes, and sliced red onion, or as part of a vibrant falafel bowl with quinoa and a fresh salad.
Pro Tips for Perfect Results
Achieving that restaurant-quality falafel and tzatziki at home is all about understanding a few key techniques. Over the years, I’ve discovered some tricks that make all the difference.
- Tip 1: Embrace Uncooked Dried Chickpeas for Superior Texture: This is perhaps the most crucial tip for authentic falafel. While using canned chickpeas might seem convenient, they often result in a mushy texture when processed and baked because they’re already cooked and hold too much moisture. Dried chickpeas, soaked overnight but *not cooked* before blending, maintain their structural integrity. When you process them raw, they break down into a coarse meal that, when baked, yields that coveted crispy exterior and a fluffy, distinct interior that won’t absorb excessive oil, making your baked falafel truly shine.
- Tip 2: Master Moisture Control for Optimal Crispness: Excess moisture is the enemy of crispiness, both in your falafel and your tzatziki. For the falafel mixture, ensure your soaked chickpeas are thoroughly drained, and don’t over-process them into a paste; a slightly coarse texture is ideal. The baking powder helps here by creating air pockets, but a drier mixture is key. For the tzatziki, diligently squeezing out the water from the grated cucumber is paramount. Cucumber contains a lot of water, and if not removed, it will thin out your yogurt dip, making it watery and less flavorful. I love using a clean kitchen towel for this – twist it tightly until no more liquid drips out. This ensures your tzatziki remains thick, creamy, and concentrated in flavor.
- Tip 3: Layer Your Flavors with Fresh Herbs and Spices: The vibrant taste of falafel and tzatziki comes from a generous hand with fresh herbs and quality spices. Don’t skimp on the fresh parsley, cilantro, dill, and mint. Fresh herbs provide a brightness and aromatic complexity that dried versions simply can’t replicate. For the falafel, consider lightly toasting whole cumin and coriander seeds before grinding them yourself. This extra step awakens their essential oils, intensifying their warm, earthy notes. Similarly, allowing your tzatziki to chill for at least 30 minutes (or even an hour) before serving allows the garlic, dill, and lemon flavors to meld beautifully with the yogurt, resulting in a more harmonious and deeply flavorful dip.
Variations and Substitutions
One of the joys of cooking is the freedom to adapt recipes to your taste or what you have on hand. This falafel and tzatziki recipe is incredibly versatile!
• Spicy Kick: If you love a bit of heat, consider adding a finely minced jalapeño or serrano pepper to the falafel mixture along with the other ingredients. You can also increase the cayenne pepper or even add a pinch of red pepper flakes for an extra fiery punch. For the tzatziki, a tiny dash of hot sauce or a pinch of smoked paprika can add an interesting dimension.
According to Epicurious, mastering fundamental cooking techniques makes every recipe easier and more delicious.
• Herbaceous Adventures: While parsley and cilantro are traditional for falafel, feel free to experiment with other fresh herbs. A handful of fresh mint leaves in the falafel mixture can add an unexpected bright note, or a touch of fresh oregano for a more Mediterranean profile. For the tzatziki, if you’re not a fan of dill, fresh mint can be used as the primary herb, or a combination of both.
• Vegan Tzatziki: Making this entire dish fully vegan is simple. The falafel is already vegan! For the tzatziki, simply swap the dairy Greek yogurt for a good quality plain, unsweetened plant-based yogurt. Cashew-based or coconut-based yogurts work wonderfully for their creaminess and mild flavor. Ensure it’s thick and unsweetened to mimic the texture and taste of traditional Greek yogurt.
• Gluten-Free Falafel: This recipe is easily adaptable for those avoiding gluten. Instead of all-purpose flour as a binder, use chickpea flour (also known as gram flour or besan). Chickpea flour naturally comes from chickpeas, so it complements the flavor profile perfectly and provides excellent binding without any gluten.
• Beyond the Pita: While falafel in a pita is iconic, don’t limit yourself! Serve the baked falafel as part of a vibrant “falafel bowl” with quinoa, roasted vegetables, and a generous dollop of tzatziki. They’re also fantastic crumbled over a fresh garden salad, tucked into lettuce wraps for a low-carb option, or simply enjoyed as an appetizer with extra tzatziki for dipping.
Frequently Asked Questions
Making a new recipe often brings up questions, especially when it comes to prep and storage. Here are some common queries I get about baked falafel and tzatziki.
Can I make falafel ahead of time?
Absolutely, this recipe is fantastic for meal prepping! You have a couple of options. You can prepare the falafel mixture (Step 2) and store it, covered, in the refrigerator for up to 2-3 days before shaping and baking. This allows the flavors to meld even further. Alternatively, you can bake the falafel completely (Step 4) and store the cooked patties in an airtight container in the refrigerator for up to 3-4 days. To reheat, simply pop them back in a 350°F (175°C) oven or an air fryer for 8-10 minutes until warmed through and crispy again.
How do I store leftover falafel and tzatziki?
Proper storage is key to enjoying your leftovers. Baked falafel should be stored in an airtight container in the refrigerator for up to 3-4 days. For the tzatziki sauce, transfer it to an airtight container and refrigerate it for up to 3-5 days. Because it contains fresh cucumber and yogurt, its freshness will gradually diminish, and it might become slightly more watery over time. Always give it a good stir before serving. I generally don’t recommend freezing tzatziki, as the texture of the yogurt and cucumber can change upon thawing, making it less appealing.
Is this recipe suitable for a specific diet (e.g., vegan, gluten-free)?
Yes, this recipe is highly adaptable! The falafel itself is naturally vegan, provided you don’t add any animal products as a binder (which this recipe doesn’t). To make the entire meal fully vegan, simply substitute the full-fat Greek yogurt in the tzatziki with a good quality plain, unsweetened plant-based yogurt (such as coconut or cashew yogurt). For a gluten-free version, the falafel can easily be made gluten-free by swapping the all-purpose flour for chickpea flour (also known as besan or gram flour) as the binder. Chickpea flour is a fantastic gluten-free alternative that complements the falafel’s flavor perfectly.
Final Thoughts
There’s something incredibly satisfying about transforming simple, humble ingredients into a dish that’s bursting with flavor and tradition. This crispy baked falafel with homemade tzatziki is a testament to that, proving that healthy and homemade can be just as, if not more, delicious than their restaurant counterparts. It’s a dish that invites you to get your hands a little dirty, to fill your kitchen with the intoxicating aromas of fresh herbs and spices, and to ultimately create something truly special.
I genuinely hope you take the plunge and try this recipe. Whether it becomes your new go-to weeknight meal or a star at your next gathering, I promise it’s a journey worth taking. Don’t be afraid to make it your own – add more spice, swap some herbs, or play with different serving styles. The beauty of cooking is in the discovery, and I can’t wait for you to discover the joy of these golden, crispy delights.